Disclosure: Every product you see here has either been used by us or independently selected by (obsessive) editors. As an affiliate of Amazon, Anything purchased through our links may earn us a commission at no extra cost to you.
Contents
If you have participated in more than two mud runs, then it is normal to feel the urge to build a mud run course or even organize a mud racing event.
A mud run course can be built with different purposes in mind. It could be built for a family, for a community of people who feel the need to participate in it more often than not, or for a company or an organization that would love its workers and staff to have a swell time to bond in the mud. It could also be built to raise money for charity.
Whatever purpose you want a mud course to achieve for you, there are important things for you to note or consider before you should think of building one.
Things To Keep In Mind Before Considering Building Your First Mud Run Course
The Safety Of The Mud Course
The safety plan of your mud course should have a professional touch to it, this responsibility should not just be handled by anyone who thinks they have an idea of safety. The safety of the course is usually the paramount aspect in the preparation for a mud racing event. It shouldn’t be taken for granted.
The Infrastructure Of The Course
The venue of the race should be able to accommodate the number of people you are expecting as well as their cars. It should also be able to accommodate the number of obstacles you intend to include in the race.
The Venue And Time
The venue of your race should be mud friendly and also a perfect fit for whatever obstacle course you intend to build. Have the meteorological report for the actual day you intend for your mud run to occur, this is due to the fact that mud races are more fun when there is rainfall.
The Course Construction
The construction of the course site should also be handled by professionals who have a detailed plan of what is intended. Remember, the safety of the participants boils down to this aspect. Other frivolities such as refreshments, clean-up apparatus such as water, shampoo, and the likes should also be arranged for.
Your mud course can be spiced up by building obstacles to make the race more eventful and fun such as mud pits, barbed wire – low crawl, ropes, and several others.
List Of Obstacles
Here is a list of obstacles to ensure that you build a mud course that will leave your participants in total awe. I will still stress the fact that you secure the services of professionals who have a proven track record of building mud racecourses. This is only a guide to tell them what you would want them to include in your mud racecourse based on your budget.
1. Cargo Nets
Cargo nets can be built in an A-frame model or in a vertical style. It would indulge the participants to climb up the cargo net on one side and come down from the other side. It helps in building their fitness and stamina in the process.
2. Slip ‘N Slide
Your mud course will be fun for everyone participating if the slip ‘n slide obstacle course is included in your mud course. It involves having an inclined plane from which to slide, either using long adult slips or inflatable slides. The participants will slide into a pool of mud from several high in other to get their bodies truly acclimatized to the mud.
Warrior Dash and other popular racing events have this particular obstacle as part of their mud racing events. It is more fun when it is situated at the latter end of the race.
3. Rope Climbing
This can be done over any soft landing surface such as water or haystacks. In most cases, there is usually a bell located at the top of where the rope is tied which a participant would have to touch after reaching a certain height. This is usually to signify if the participant climbs the rope to the required height.
The ropes can be either knotted to make for easy climbing or they can be left plain, but in such a case, it should be situated at the beginning of the obstacle course and not at the middle or towards the end as it would be extremely difficult when the mud runners are all wet and slippery at these times of the race. It is normally included to test the tenacity of the mud racers, as well as to build up their upper body strength.
4. Barbed Wire – Low Crawl Obstacle
If you really want your participants to feel the real effects of mud on their skin, then I suggest you incorporate the barbed wire – low crawl into your mud racing course.
To cut down on your budget, you can simply use a rope, then have a couple of ribbons dangling from it, but ensure there is a sign or a volunteer guide to ensure that the body of those crawling does not touch the ribbons.
Be it barb wire or ropes and ribbons, as long as it gets the participants to crawl on their bellies, then it is absolutely fine.
5. Objects For Lifting
For your mud racecourse, you can also include liftable objects that the participant can carry such as logs, PVC pipes, sandbags, and anything at all that can be carried by either individuals or by a team effort.
Having this included in your mud course will go a long way in building the team spirit amongst the racing participants. It will also cost you a little amount to introduce, as the material required to make these objects can be found in the venue of the race.
6. Mud Pools And Mud Pits
This should actually be the primary obstacle to have in your mud racing course. Mud racing is about mud, more mud, and even more mud. The more mud you can make available in a mud course, the better. The mud could be thick, light, or a combination of both.
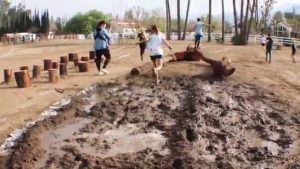
Whatever texture of mud you may have in mind, ensure that you have mud pools or pits at various intervals of the race. It could also be constructed before approaching obstacles just to spice it up a little.
7. Monkey Bars
Including monkey bars in a mud course will help to test the grip strength as well as the mental capacity of the participants.
Monkey bars can be built either with straight frames which would require the participants to jump in other to have a go, or it can be constructed in an A-shaped form which would require the participant to climb up gradually from a slope. ( Check out this Obstacle Course Monkey Bar Kit)
The surface underneath the bars should make for soft landings such as water or soft grass. It should also be included at the start of the race since the participants would still be fresh at that point, or somewhere in between the race, but not at the end of it.
8. Obstacle Walls
Walls in an obstacle race are also a must-have regardless of your budget. It is one part of the race that mud racers always look forward to. They could vary in height ranging from 3-feet to 11-feet and can also be inverted or slanted.
Some could also be covered with ropes to make for easy climbing, while others are just simply gruesome in nature and would require more from you than what you are prepared to give.
It can also be overcome individually or by a team effort. This depends on the nature of the wall in question, the harder the wall, the more bodies you will need to get over it.
If you are a “Wannabe” mud racer reading this, I suggest you build an obstacle wall in your home to help you practice in time for the event. It can also be used for several other purposes such as body push-ups and armbar racing.
How To Build An Obstacle Wall
Before we proceed with the know-how’s on how to build an obstacle wall, I enjoin you to please read this legal disclaimer below
*Building an obstacle wall without prior knowledge or experience of handling power tools can be considered dangerous. In the event of you falling off awkwardly during the construction or usage of this wall, which could result in several physical injuries or even death, this article will not be held liable for any loss.
Please, make sure you comply with all building codes in your area. Also, do well to consult your local zoning laws. All obstacles built are at the owner’s risk*.
You tend to gain a lot of experience when you undertake personal activities such as building your own obstacle wall, which is a great way for you to add to your motor skills even as you prepare for a mud race.
If you are not a carpenter or an engineer, I employ you to follow these instructions to the very latter in other to get your obstacle wall fully up and spurring you on.
An average obstacle wall as will be explained here should take you back a little under $300 excluding the required tools though. But there are some modifications you can make in the course of making yours in other to fit your needs as well as your budget.
Here Is The List Of What You Would Need To Get Your Obstacle Wall Standing
- One piece of 8×4.5″ plywood should be cut into two 4×4″ sections for eight-foot
- 4×4 fence posts
- Seven 8foot 2×4″
- Three 8 inch diameter hex bolts of varying length
- A little over a handful of 2 inches and 3-inch screws.
Step 1
The first thing to do at this stage is to layout the Fencepost after which you then place your 4×4 sections of plywood on top.
Step 2
Ensure that the edges of your plywood do not overlap the edges of the fence post. They should be evenly flushed.
Step 3
Use two screws of 8 inches in length and tack down the plywood to the fence post beneath it. Also, use screws of 3 inches or two inches for the top and corners of the plywood.
This process, if carried out as stated will hold the fence post and the plywood together as you drill other holes that are necessary. The screws are temporal and will be removed at a later stage.
Step 4
Using a rubber tape measure as well as a pencil, measure 6 inches downwards from the top of the plywood, then measure 3 quarters inches inwards. This should take you to the centre of the post. The post is actually about 3 and a half inches wide, so you should not have any challenge making this measurement.
Step 5
Repeat this procedure in step 4 at the bottom, and also all around the corners of the board.
Step 6
Use a drill that has a levelling bulb and drill three 8 inch holes along the eight pencil marks you have drawn. Your 8-inch hole should go through the plywood and the post as well.
Step 7
Ensure to label your piece so that you know where each one goes when you want to assemble them later. The piece going up should be marked differently from the ones going in the opposite direction.
Step 8
Now, remove the screws you used on a temporary basis, and take your plywood pieces to a corner. Do well to label the pieces so as to know where each one should be. This is important especially when it is time to assemble them together.
Step 9
Use your tape and measure another fence post, measure, and mark the centre at 4 feet. Still using the tape, measure one in 3 quarter inches from the edge of the post, this will give you the dead centre of the post.
This post will be the footer piece you will lay on the ground to which the upright will be attached to. Label the footer depending on the side you are working on.
Step 10
Lay the upright on the footer. Ensure that the label on the upper right you are using is labelled in the upward direction. Please do not mix this up.
Step 11
Roll the footer into position so you can see the centre bar. Take your upright and centre it on the centre mark of the footer. Now you may want to draw two straight guidelines one in three-quarters inches in either direction of your centerline to bracket in your upright
Step 12
Slide the upright down so that the edges of the upright and the footer are flush. You may want to use a square to check your angles as well.
Step 13
Measure one three quarters inches up from the bottom edge of the upright and one in three-quarters inches in from the outer edge, so you’ll be centred on the upright and the footer marker with your pencil and then grab your drill.
Step 14
Sit or kneel on the upright keeping your drill level and drill down through both the upright and the footer.
Step 15
Take the uprights off and make sure that you’ve gone all the way through the footer. And if you need to, you might want to take your drill and go through the holes a couple of times. Now, grab a two by four and put it on top of your footer.
Make sure it is on top of the side of the footer with the centre hole in it. square off all the edges top, bottom, and sides.
Step 16
Measure three inches down from the top edge in one and three-quarters inches in from the outer edge.
Step 17
Hold the two by four down tight and drill a hole straight through the two by four and the footer, you may need to go through each a couple of times.
This is going to become the inner support beam of your frame. Label the beam for the side you’re working on and which direction is down to the footer and to the ground. In other words, you might want to give the support beam and footer matching marks for the corresponding holes.
Step 18
For the outer support beam, you are going to need an extra piece to account for the support. Having said that, measure out and cut out six-inch pieces.
Step 19
Take one of the six-inch pieces and lay it on top of your footer on the same side as your centre hole and the inner support beam hole, but place it on the opposite end from the inner support beam.
Step 20
square off the edges, drill some pilot holes and tack it down with four three-inch screws.
Step 21
Measure three inches from the end of the post and one and three-quarters inches in from the outer edge and drill through both the footer and the attached six-inch piece.
Step 22
Get an eight-inch hex bolt and slide it through the footer and the bottom hole of the upright. On the wall of the standing footer rest it on the ground on the outside of the upright.
Lay the footer on the ground six-inch section facing up and the upright on top of it as you slide the bolt in from the bottom, rest the unconnected end of the upright on another fence post.
As a note, you may want to place some of the three eighth inch nuts under the post to account for the bulkheads on the other side. This will keep everything level as you are working.
Step 23
Adjust the upright so it’s as square as possible, then place a washer nut on the bolt and tighten it.
Step 24
Take an eight-inch bolt and slide it through the footer six-inch section and your outer support beam. Grab a washer nut and hand tighten it.
Step 25
Go to the other side and slide a six-inch bolt through the footer and inner support beam.
Step 26
Attach it with a washer nut if you so desire. Now, go to the top end of the upright. Cross the support beams outer beam over the inner support beam.
Cross them up at the top with about three inches hanging over on each side. Tuck the beams down with a two-inch screw each and drill a level hole through them and you’re good to go.
Step 27
Take the 10 screws out and make sure that you’ve drilled through everything with a wide enough hole to allow the bolts to easily slide in and out.
Step 28
Now, onto the wall phase. First, grab a two by four and measure the dead centre at four feet and then cut it in half. Do this twice.
These will become the horizontal supports for the wall pieces of the peach. Take the two four foot pieces of one of the two by fours, just cut and lay them out parallel to each other. Repeat this for 3 other pieces.
Step 29
Go around the horn and make sure that not only do the edge of the two by four-flush with the edges of the plywood but also that the two by fours are centred with the holes you drilled in the plywood earlier. This is very important.
Step 30
Next, drill some pilot holes through the plywood and the two by fours and screw them together.
Step 31
Use 4 two-inch screws for each two by fours spreading them out evenly in a single line. Once the two by fours are firmly attached, the plywood leaves the drill with the three eighth inch bit right through the holes you made in the plywood earlier and drill straight through the two by fours below. Do this for all four holes.
Step 32
Once both wall faces have been assembled, take the remainder of the two by four we removed the six-inch sections from the footers and cut off a 40-inch piece.
It’s a good idea to send this one down a bit because it’s going to be the top edge of the wall and it should be nice and smooth so that when you grab a hold of it, you can attach it to this piece at any time, but it is easier to centre it once the wall is upright, and flushed to the top edge of the wall on the same side of the wall as your horizontal support and attach it with six two-inch screws. I
t’s a good idea to drill your pilot holes and have your screws in the two by four before you go and attach it to the wall. It’ll just make life that much easier.
Step 33
To assemble this piece, it’s a good idea to lay out the pieces in the order they’ll be put together. So start from the inside and go out from the centre. Lay down your wall sections face up, followed by your uprights, then footers. Then inside and outside uprights support beams.
Follow the labels and the arrows written on the pieces to ensure you have them all going in the right direction. It’s also a good idea to have each of your bolts ready to go with two washers and a nut.
First, put the wall sections on top of the uprights. Slide a bolt through a washer and then through the front of the wall face and upright. Do this for one edge only for both wall faces, and don’t attach the washers or nuts yet.
Step 34
Go to the other side and attach those four holes with washers bolts. Once that’s done, go underneath and attach washers and nuts to all eight bolts of the wall and fix it.
Step 35
Next, slide one footer forward and align the footer’s centre hole with the corresponding uprights bottom hole.
Make sure the six-inch section of the footer is facing outward. Go to the inside of the upright and slide an eight-inch bolt through the washer and then the upright all the way through the footer. Attach with a washer and nut, and tighten only at this point. Go to the other side and do the same thing.
Step 36
Grab an eight-inch bolt and washer, go to the top edge of the wall and lift it up properly. Be careful when lifting due to weight. Keep a hand on it at all times and try to stay to the outside of the fall line. Slide the bolt through the washer and the inside of the upright support beam hold on to the wall and grab the inner support beam.
Slide the support beam onto the bolt. Temporarily put the washer and nut onto the bolt and tighten only. grab an eight-inch bolt and washer and slide it through the inside of the footer support beam hole on the side with the six-inch section of the outer support beam and slide it onto the bolt and hand tighten with washer nut.
Step 37
Go back to the upright remove the washer and bolt and slide on the outer support beam and tighten the washer and go to the footer and attach the inner support beam.
Step 38
Repeat these steps for the other side starting with the upright and inner support beam followed by the outer support beam and footer, then from the outer to the upright.
Step 39
Finally, enter the support beam of the footer.
Step 40
The last step is to go around and tighten all the nuts and bolts.
Now you can practice for the next mud racing event from the comfort of your home. But aside from building an obstacle course, have you ever thought about raising money for a noble cause and you seem not to know how to go about it?
Well, apart from opening a go fund account, organizing a mud racing event is a sure way to go about it. The next phase of this article should help you with that.
How Do I Organize A Mud Run?
So here is the deal. Aside from selecting the right obstacle course and other things relating to it as discussed at the beginning of this article, here are other things you should put in place.
1. Get A Medical Team On Standby
You should ensure that not only is the obstacle course safe for the mud run, but there should also be a medical team to help in case of injuries. There also has to be an effective walkie-talkie among your volunteer members to help with communicating about the happenings of the events.
2. Have A Good Insurance Policy
Without an insurance policy, you probably won’t be allowed to host the event in the first place. So it is important that your proposal holds at least a $1 million policy for the race.
3. Organization Of The Event
You have to ensure that there is a proper organization and that the volunteer force which is very important in the success of the race is up to speed with what their functions are.
If you can’t handle the organization on your own, you could hire a company that has apt experience in this kind of. Here are some of the structures you can put in place to ensure a smooth process.
- Race director: This person should be in charge and also oversee every aspect of the race. Nothing should happen on the racing ground without his or her approval.
- Course builder: This segment of workers is responsible for developing the various obstacles that are to be present in the race, and they also ensure that every obstacle is built to the required standard in other to ensure the safety of the participants.
- Race owners: This should involve you, and other persons you would want on board. You would be in charge of the venue location and approval, the required budget for the entire race, insurance, permits, consumables, and other registrations that would require a hitch-free run.
- Volunteer director: This person should be in charge of recruiting volunteers and also ensuring that they are properly managed and catered for. Remember, they are a very important aspect of the successful competition of the race.
- A safety director should also be involved, who will oversee the safety aspect in the course of the race.
If all these are put in place, then you can be sure that you would have a very hitch-free event. Take time to plan for it as well.
4. Publicity
You should also ensure that you take advantage of social media to publicize your event. Create a web page that would help aspiring participants register, then help promote the race by using various media outlets. The greater the publicity, the greater the chances of people applying in their numbers.
It is also important that your participants get the right food to eat on the day of the event. Not every kind of food should be allowed in the mud racing events, especially if they are too heavy and would slow the participants down.
What Should I Eat Before A Mud Run?
There are types of food you should eat before a mud run and after a mud run. Please take note of the following
- Before the event: Two days before the event, eat food that is very rich in calories and this kind of food usually comes from carbohydrates. So ensure you consume lots of carbohydrates before the events because you are definitely going to burn a very large amount of calories before the race. Please ensure that you don’t consume too much food the night before the event. Eating too many carbohydrates does not mean that you have to overfeed. You should wake up light on the day of the race. Some of the food to eat the night before a mud run includes skinless potatoes, brown rice, bread, pasta, pancakes, and generally any food that can be digested easily.
- The morning of the race: Try and finish your breakfast about two to three hours before the commencement of the race, and also ensure that the food you consume is carbohydrates that can be digested easily. Be careful not to try a food you haven’t tried before especially before the race. Any food you eat at the point of beginning the race should be one you are sure your body is accustomed to.
- During the race: Bananas should be on a stand-by over the course of the mud race as well as water. If you are looking at building your own mud racing event, this is definitely a necessity.
- After the race: After the race, protein bars should be consumed as they aid post-event recoveries. Then, you can think of the beers and other merriment that comes with the after-party of a mud run.
If you are also looking at getting your body in shape for a mud run, here are a few tips to help you.
How To Train For A Mud Run
- Increase your road race time in other to get your body acclimatized to the rigours of mud racing.
- Engage in body training to improve the strength of your ankles, upper body, and biceps especially since you would be doing some heavy lifting. Visit the gym at least twice a week.
- Train on surfaces that would be similar to a mud course such as grass surfaces and beach surfaces. This should help you adjust to what the mud course will be like.
- Train in your mud gear event to help you get used to them, and also know if you need to make changes. Here are some mud racing gears you can try. (Shirt), (Compression Pants), (Shoe).
Read Also: Best Shirts For Mud Run (Top 6 Reviewed)
Following these easy but effective steps should set you on the right part to getting yourself ready for a mud racing event.
How To Build A Mud Run Course – Conclusion
If you have ever thought of organizing a mud racing event, now is the time. Don’t let the fear of failure cloud your abilities. Having the right organization in place as stated in this article will help your mud race experience a very high degree of success.
And one more thing, if you want to organize a mud racing event and have no plans whatsoever of participating in them, then I suggest you do a rethinking. If everyone is getting dirty then so should you! To the success of your event. Cheers!